Status group addresses, the fast way

Freddy van Geel
Specialist
When you import a knxproj file, you select the elements used in your project.
You can do this very fast by selecting the middle group, and choosing the desired element type.
To add a Status Group Address to all elements, we built in a very smart calculation function.
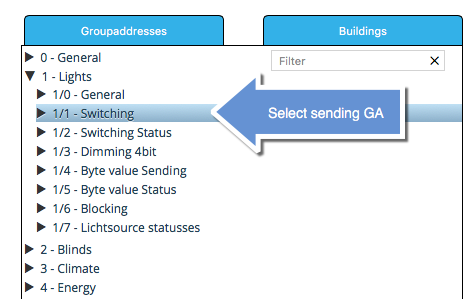
1st you import the project, all group addresses will appear in the left column, where you can select a Middle group of all elements.
In this example we would import all switching elements. You can see sending Switching Group Addresses are in Middle group 1/1/- and Switching Status Addresses are corresponding in 1/2/-
Next, on the richt column, you tick the box "Add additional Status Group"
In the field below this, you see -/-/- this is where the calculation is done.
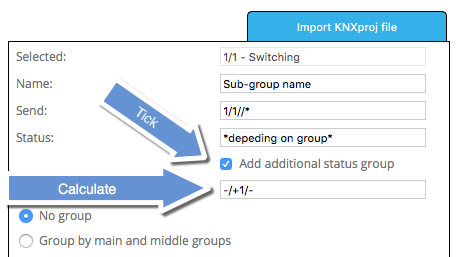
In this example we would like to add Status Group Addresses with a middle group of 1 higher than the Switching Group Addresses.
So we use -/+1/-
Now, click ADD and all elements of the chosen middle group will be added to your project.
If you want, you can repeat the process for all other middle groups you want added to the project.
Note:
If necessary you can calculate on each level. So if you have (for any reason) a status group address that's +1 on the sending address, and +1 on middle group level, you can use -/+1/+1
Example:
If, for example, you have your group addresses all in the same Middle Group, you can also add status groups this way:
Say you have your project set up like this:
1/1/1 Sending Switch light 1
1/1/2 Switching status light 1
1/1/3 4bit dimming light 1
1/1/4 1byte value light 1
1/1/5 1byte value status light 1
1/1/6 Sending Switch light 2
1/1/7 Switching status light 2
1/1/8 4bit dimming light 2
And so on...
Then you don't select the middle group, but select all sending Group Addresses with CTRL (or CMD on Mac) one by one.
Then the calculation in the field will be -/-/+1 to add a Status Address that is 1 higher.
You can do this very fast by selecting the middle group, and choosing the desired element type.
To add a Status Group Address to all elements, we built in a very smart calculation function.
1st you import the project, all group addresses will appear in the left column, where you can select a Middle group of all elements.
In this example we would import all switching elements. You can see sending Switching Group Addresses are in Middle group 1/1/- and Switching Status Addresses are corresponding in 1/2/-
Next, on the richt column, you tick the box "Add additional Status Group"
In the field below this, you see -/-/- this is where the calculation is done.
In this example we would like to add Status Group Addresses with a middle group of 1 higher than the Switching Group Addresses.
So we use -/+1/-
Now, click ADD and all elements of the chosen middle group will be added to your project.
If you want, you can repeat the process for all other middle groups you want added to the project.
Note:
If necessary you can calculate on each level. So if you have (for any reason) a status group address that's +1 on the sending address, and +1 on middle group level, you can use -/+1/+1
Example:
If, for example, you have your group addresses all in the same Middle Group, you can also add status groups this way:
Say you have your project set up like this:
1/1/1 Sending Switch light 1
1/1/2 Switching status light 1
1/1/3 4bit dimming light 1
1/1/4 1byte value light 1
1/1/5 1byte value status light 1
1/1/6 Sending Switch light 2
1/1/7 Switching status light 2
1/1/8 4bit dimming light 2
And so on...
Then you don't select the middle group, but select all sending Group Addresses with CTRL (or CMD on Mac) one by one.
Then the calculation in the field will be -/-/+1 to add a Status Address that is 1 higher.
Categorieën
- 377 Alle Categorieën
- 34 Release notes
- 10 Release notes - Pairot
- 24 Release notes - xxter
- 13 Pairot
- 48 Algemeen
- 6 Device
- App
- 1 Project
- 3 Voice assistants
- 19 xxter
- 129 Algemeen
- 48 Algemeen
- 35 Nieuwe functionaliteiten en nieuwe features
- 23 Apps
- 22 Apps algemeen
- 1 Apps Beta release
- 24 Profielen
- 7 Profiel algemeen
- 16 Pagina's en pagina elementen
- 1 Waarschuwingsservice
- 97 Project
- 7 Logica
- 2 Aanwezigheidsdetectie
- 13 Acties
- 3 BREEAM
- 14 Cameras
- 16 Componenten
- 1 Config Tool
- 6 Opdrachten
- 28 Native scripts
- 3 LUA scripts
- 3 Statistieken
- 51 Device
- 43 Device algemeen
- 3 Toegangsrechten en lokale gebruikers
- 4 Aanwezigheidssimulatie / Presence simulation